|
| Home |
| Chemo Turban July 2012 |
| July 12, 2011 Furry Hat |
| June 28, 2011 2 more chemo hats and seaming! |
| June 26, 2011 Chemo Cap, Transfer Lace |
| June 4, 2011 Chemo Kerchief |
| June 29, 2011 Adjusting Brother/KnitKing Ribbers |
| March 2010 Lesson #8 |
| Sept 1, 2009 Lesson #7 |
| Sept 1, 2009 Lesson #6 |
| June 30, 2009 Lesson #5 |
| June 16, 2009 Lesson #4 |
| June 1, 2009 Lesson #3 |
| May 18, 2009 Lesson #2 |
| May 6, 2009 Lesson #1 |
| Yarn Cone Doll |
| Mar 30, 2006 |
| March 2, 2006 |
| February 16, 2006 |
| February 2, 2006 |
| January 19, 2006 |
| January 5, 2006 |
| Jan 23, 2008 Beanies and Chemo Caps |
| Nov 17, 2005 |
| Dec 1, 2005 |
| Dec 15, 2005 |
|
|
|
|
Horizontal Braid (Knitted into Garment)
Determine where you want the braid and knit your garment according to the pattern you wish...for example: place the braid
at the waistline or near the edge of your sleeve.
When you come to the point where the braid will be inserted into the garment piece, either turn off your row counter OR
write down the row number so you can return at the end of this insert.
You will be knitting from Right to left across the bed of your machine.
1. Decide how many stitches you will use for each loop of the braid...3 4 or 5 stitches (thicker yarn will not require
as many stitches as thinner yarns).
2. Also, reserve 2 stitches on each edge for seaming. Remember to include these in your planning.
3. For this example we chose 4 stitches.
4. COR...place all stitches in hold except for the far right 6 stitches. Carriage in HOLD
5. Knit 1 row to left and pull the far right 2 stitches to hold (these will be for the side seams and are not part of
the braid). Knit 15 more rows on these 4 stitches.
***6. COR Push the next 4 stitches into upper work and knit 1 row to the left on these 8 stitches.
7. COL Pull the 4 stitches on the right to hold. Knit 15 rows on the remaining 4 stitches.***
8. COR repeat from *** to *** across the bed using weights or fingers to hold stitches as required. Do not knit the
least 2 stitches on the left (these are your seaming stitches)
9. COR push the last 2 stitches to upper work and knit across to the left on these 6 stitches.
10.. COL Take hold button off and knit 1 row to the right on all the stitches.
RESTART YOUR ROW COUNTER AND KNIT THE REST OF GARMENT
To create the braid, after the garment piece is completed, twist the first loop and then pull the next loop through this
and work across by pulling the next loop through this across. Secure the last loop as desired (stitch down, use a button
or ???)
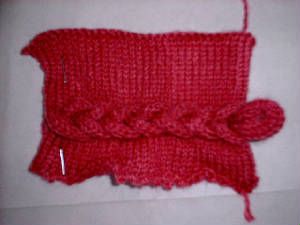
BRAIDED TRIM ON THE DIAGONAL
Knitted into the garment (demoed by Lucie Dec 1/05)
This trim takes a bit of planning to get it where you want and how you want. You will need to decide how steep the diagonal
must be, anotherwords2 rows for every loop of the braid or 4 or ??? This example is 4 rows and seems to work nicely.
Your braid will work diagonally across the bed and your knitting starting on the right of the bed.
To allow for decent seaming, you need to plan to have 2 stitches on each side of the braid that are not part of the braid.
Also the thickness of the yarn will be a determining factor in how many stitches for each loop. this example uses 4 stitches
1. COR Place all stitches in hold except for the 6 on the right near the carriage. Carriage in Hold
2. Knit 1 row to the left. Place the 2 far right stitches in hold now too. Knit 15 more rows on just the 4 stitches
**3. Place all the stitches on Left back in work, Knit I row to the left.
4. Place the first 4 stitches on right (as well as the very first 2) in hold. Knit 3 more rows on the rest of the needles
in work.
5. COR Now, place the far left needles(that are in work) in hold except for the 4 closest to the carriage. Knit 16
rows on these 4 needles .**
6. COR Repeat ** to ** across the bed, until last 2 stitches remain
7. Place the last 4 needle set and the last 2 back in work. Knit to the Left
8. COL Take off hold button and knit across all stitches. (Turn off row counter tripper or write down row number, since
this will be the number you must return to after the braid is complete to finish your garment.)
9. COR Place carriage back in hold. Pull all needles to hold. Put the first 6 needles back in work, knit 4 rows on
these 6 needles.
****10. COR Place next 4 needles in work, knit 4 rows****
11. Repeat from **** to **** across the bed.
|
|
|
|
|
|
|
|