How to Make a Cast On Rag
Use Knit-Cro-Sheen or something similar that has a hard finish.
Procedure:
Select the last 12 needles on the far right of the machine.
e-wrap and Knit one row to the left. * Edge decrease the last stitch on the rightand pull the first empty needle on the
left all the way out (creates an automatic wrap)and then knit TWO rows*.
Repeat from * to * across the full bed of the machine....this makes a cast-on rag of 100 stitches, so to make it wide enough
for the full width of the machine, don't bind off the strip. Instead, move the 12 stitches on the machine back over to the
right side of the machine and continue across the machine bed one more time.
Then, after the last decrease, increase, knit ONE row, and bind off. You will now have a bias strip with a total of 200
loops.
******************************
So, now that you have your cast on rag made(or you may use a piece of scrap knitting), hang the cast on rag onto your needles
for your swatch, usually 60 stitches for standard gauge machines, pulling one needle through each loop. Beofre you start
hanging the cast on rag, move your carriage to the Left side of the bed. As you hang the rag onto the needles,
pull the needle into holdd (all the way out) and then when you have all the needles in the rag for your swatch, put
your ravel cord into your carriage and knit one row.
You are now ready to knit our swatch.
Technique:
Lace: for those with electronic or punchcard machines chose a lace pattern and follow the instructions in your manual
for knitting the lace. Don't forget to mark the swatch so you are able to measure it. Also, don't forget to mark
the swatch with eyelets after the lace swatch is finished to tell you in the future what tension you used.
For those of you without patterning facilities, we will be doing hand transfered lace. As well, those of you with
patterning facilities, also need to try the hand transferred lace, so separate your swatch with some waste yarn and then do
another swatch using hand transferred lace.
Instructions for hand transferred lace follows:
***************************
Here are a couple of websites with hand transferred lace patterns you may find interesting:
Copy and paste these urls into your browser!
http://heidisknittingroom.com/FlowersandBowChart.htm
The above is a detailed hand transfer pattern.
This is a simple "heart" hand transferred pattern:
http://home-and-garden.webshots.com/photo/2353094400102033689LjpWvG
**************************************
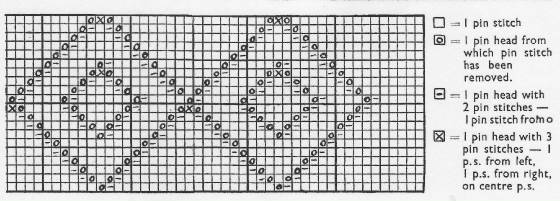
Make a chart for yourself depicting the graph you wish to follow or use the following charts one from a magazine and the
other hand done up.
Basically, you make all the transfers on one line at once, and then knit 2 rows with the carriage and then make the next line
of transfers. If you were using a lace carriage it would only transfer in one direction and would transfer the opposite
direction on the return of the lace carriage. Sometimes it takes many passes to complete all the transfers, whereas
hand transfering is all done at once. If you are transferring a couple of stitches (one from each side) to a central
stitch, please make sure you transfer consistently, another words, if you start by transferring the L stitch first, continue
doing it this way.
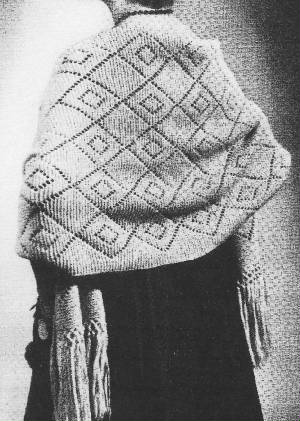
The following picture and graph are for hand transferred lace used as a stole....looks very effective.
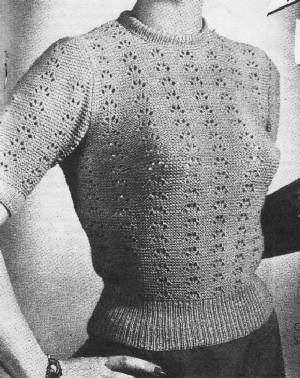
The next picture is a ladies pullover also done with hand transferred lace, and is followed by the graph done up by hand.
Hope it makes sense.