LESSON #4 2 COLOR TUCK
This is the method of doing the tension swatch we will be doing this time:
This is another menthod of doing the swatch and since I'm endevouring to give you as many different ways of doing it as
possible, here is another way!!! This was given to me by Carole Struthers
************************
Hi Gladys,
I think the best way of making a swatch is as follows. I start out with waste yarn and knit a few rows. Then on the right
hand side of the machine, I empty every other needle onto it's neighbor for every stitch tension I'm going to use leaving
the empty needles in working position. If I've used an extra notch on the tension mast, I skip a couple spaces from where
I've marked the tension and make a hole for every notch I've changed to on the tension mast. On the Left hand side, I make
holes for the number of rows I've used 1 hole for every 10 rows. (I may leave these for a week or so and that way I don't
forget what the tension was being used.) Using this system and always, always in the same order gives me everything I need
to know... Over on the left hand side I do the same for every ten stitches telling me how many stitches I've used for this
swatch. I.e.: right hand side 7 holes =tension 7 while on the left side 4 holes= 40 stitches.
I then knit up to row 30 and tag a marker of bright yarn over the 11th needle on each side of 0 for bulky,20 sts to measure
between and 21 on each side for 40 stitches to use as the measuring number for the guage.
Once done, I go on up to row 60 but a lesser number is okay as long as you mark what it is. I then knit a few rows of waste
yarn again and on the left hand side I put in holes for every 10 rows I've knit in the swatch. I.e.: 60 rows, 6 holes.
If I'm using a tuck or fairisle, I might measure from edge to edge three places and then average them out to get gauge.
I also make a little cardboard tag with a snip of the yarn and tie it into one of the holes I've punched in the card. I
put the name of the yarn, the tension I knitted it at and the gauge I got when swatching it. (You know how we hate to make
swatches.) I've got a bunch hanging on the wall over my machine so if I ever use that yarn again, I've got a good starting
point. Works 4 me!
Carole Struthers
******************************************************
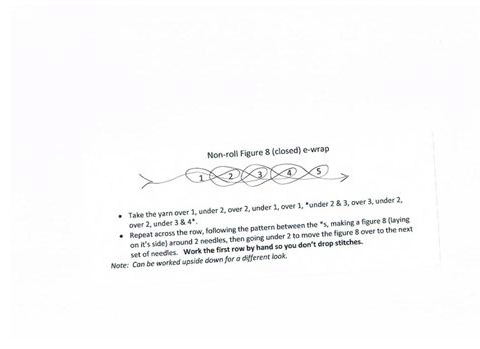
Cast-on:
We will be casting on doing a figure 8 e-wrap. I'm including a diagram....its really easy once you try it.
Figure 8 e-wrap:
This one makes an 8 laying on its side around the needles
1234567
Come up between 2&3, go over the top of 2 and under 1, go back over 1 and
down between 1&2, go under 2&3, up between 3&4, down between 2&3, up
between 1&2, over the top of 2, under 3&4, over the top of 4 under 3, over the
top
of 3, under 4&5, over the top of 5, under 4, back over the top of 4, under
5&6, etc.
Slightly different look to the edge, sort of a braided look.